
After the scanner arrived and I
unpacked it the first thing I noticed was it's bulky size. While not
any bulkier than some standard flatbed scanner, it was still bulkier
than our smaller Canon Lide60 that sat on my wife's desk and had
become the workhorse for our family. The bulkiness did not take long
to get used to and it now sits next to my computer as my newest
friend.
My intitial concern was having to put
Microsoft Windows back onto my computer to make the program work.
The scanner comes with Canon's own scan program, Archsoft photo, and
Adobe 8 photo elements. None of these programs are compatible with
linux. I had opted out of using windows several years ago choosing
the benefits of open source computer software over the expensive
windows software and applications you had to purchase over and over
with each newer operating system microsoft produced. While I am
currently working on finding the necessary open source software to
support it, it does run fairly functional on my Virtual box windows
XP Installation which I only use for some older programs that aren't
supported anymore. I haven't bought any new windows software for
about 5 or 6 years now.
The scanner comes with three film
holders; one for negatives, one for slides, and one for 120 format.
At this point of time I do not want to go into the software and how
to work it. I found the software fairly intuitive and
experimentation is the only way anyone can achieve the results they
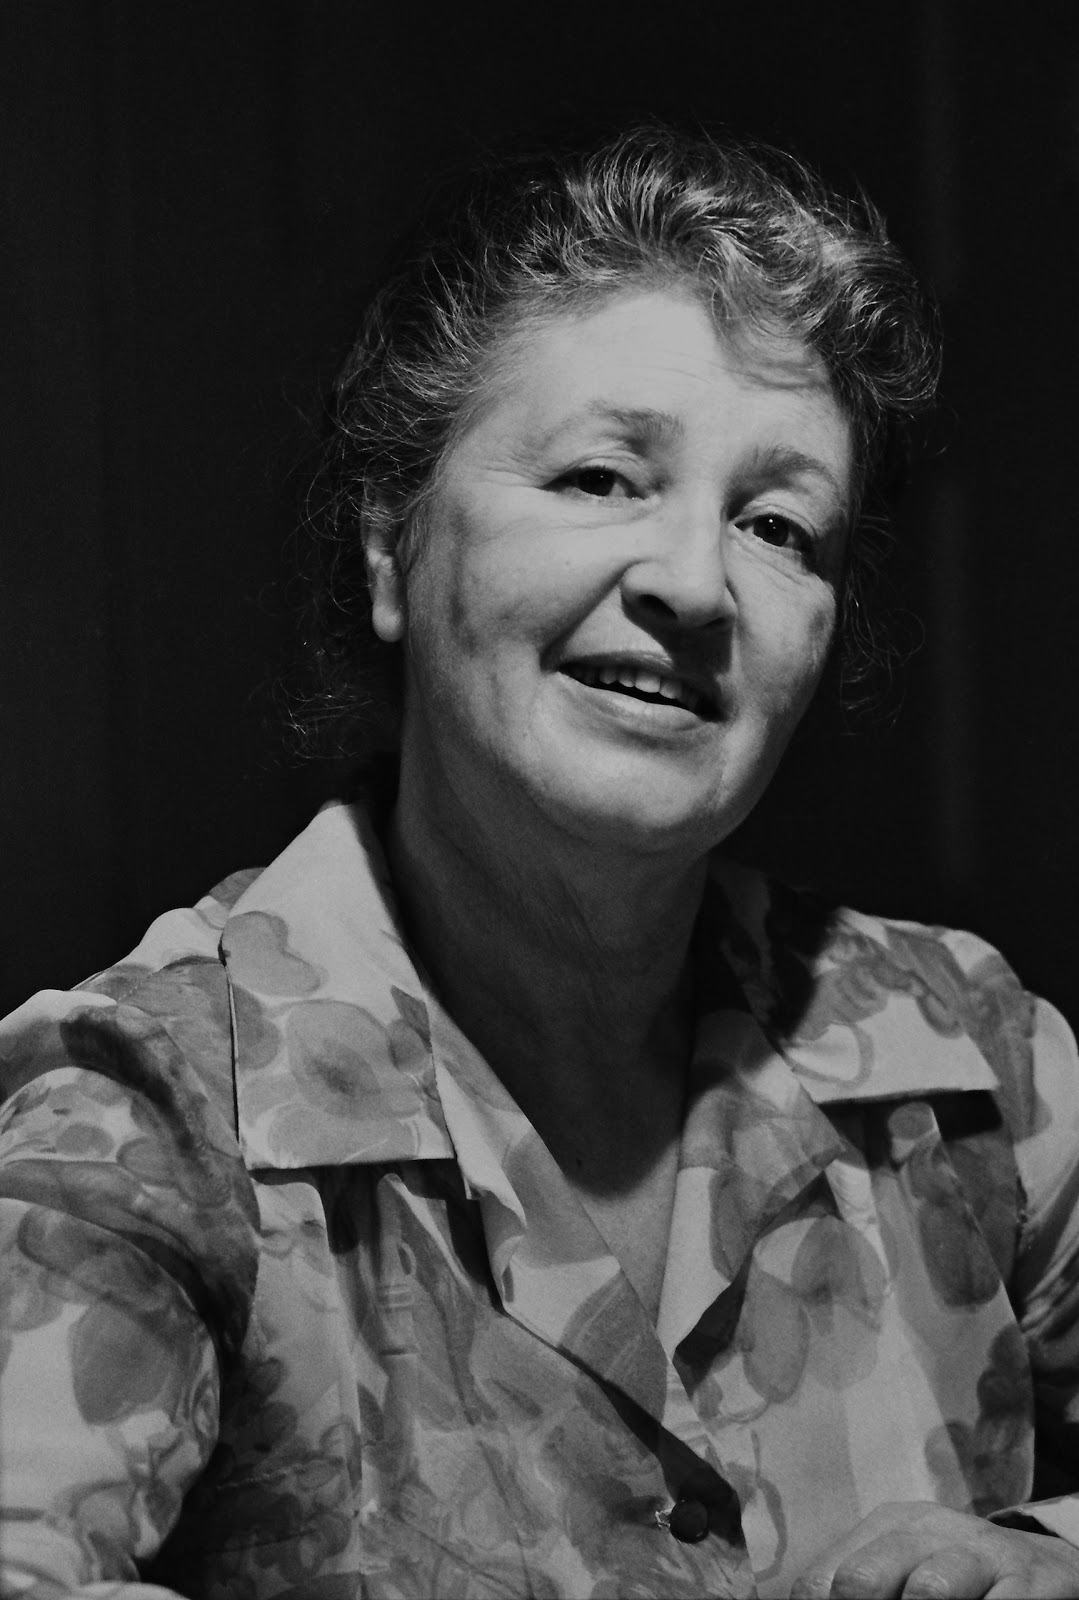
desire personally. Canon does not list a D-max value for the printer
but I found it capable, at least for me, where shadow detail is
concerned. It was even able to pick up or differenciate between the
iris on an eye in a scan of a picture I took years ago of my mother.
This was not visible even with dodging techniques when I printed it
on photo paper.
Scan of my mom taken from the Kodak Tri-X film negative. Just "right-click" on the images to open a new window, then click on the image to see a fullsize image.
Below is a crop section showing the eye.

The scanner can scan up to a 9000 dpi,
although as I understand it, acutal mechanical resolution is only
available up to 4800 dpi and the rest is done through some kind of
software doubling effect. I couldn't go into it more because I
wasn't really interested. The higher quality Nikon and Minolta
scanners only got aroung the 4000 resolution as I recall so that was
enough for me. Dpi is only one judge of resolution. The actual
sharpness of the lense is more important to me and I don't remember
any statistics for this. The best way to judge it is subjective at
best. I figured that since Nikon and Minolta both made cameras with
sharp lenses, the Canon would do well too since it was a camera
manufacturer. In my opinion, this is true of the Canonscan 9000F.
It's lense is within the range of sharpness I expected and it is
probably the best film scanner available within the price range which
most people can afford.
The fact that most people aren't that
quality concious with photography and simple 4 x6 prints are what
most people want, high tech film photography will be left strictly to
professionals who can afford it. Expensive film scans will
eventually be the only way to go for those who cling to the format.
This may be the last chance to get a decent scanner that can do all
of your film before the film industry totally dies off in the wake of
digital. There is increasingly less interest for film, and partly
with good reason. Look at all the advantages for both the industry
and the person.
- Better detail in images
- No dust
- More pictures “turn out” and those that don't you just delete.
- No waiting to see your pictures. Just view them at the store kiosk, on your computer, online, or in a photo frame.
- No negatives to store. Store hundreds on cd or thousands on dvd and blu-ray discs.
- No need to take them to store for printing at all if you keep a quality printer and don't mind the higher cost of printing yourself
- Send them for printing over the internet from where ever you are. No need to drive to the store twice.
- Reduced cost for the printing industry. No need to keep a film developing machine or film scanner. Now you can make money just printing the photos.
- Don't have to worry about keeping film chemistry fresh of risk ruining someones negatives.Let's face it, even the cheapest digital camera pictures look better that the old 110, 127, and 35mm prints from the cheap consumer camera of the past.
Below is a picture of the film/slide
mounts. The 120 mount has a plastic piece that slide under the
negative and helps hold it up to prevent buckling of the film. They
seem to be sturdy enough. My concern is whether they will hold up
without breaking. Time will tell. They seem to hold the negative
flat enough except for the 35 mm strip. If you are using a 4 frame
negative, (which is the way most photo stores cut them), then the one
loose end will curl at the end. To prevent this, turn the negative
around and scan the one frame separately. I would think this would
be a problem for most film scanners.

One of the considerations is that
flatbed scanners generally have more of a dust problem because they
are open instead of feeding the negative through soft brushes that
remove some dust when the negative enters the dedicated film type
scanner. You will need to be more dust diligent. There is a program
called “fare” that does a decent job of removing dust. This
program, as other type of programs, usually cause some loss of
sharpness. Also, they cannot remove all dust and will not remove the
worst cases. Whether or not you choose to use these type of
programs, you will still need to prevent as much dust to begin with.
Overall, I found the Canoscan 9000F to
be just what I needed. For a guy who couldn't afford the more
expensive dedicated film scanners on the market that would perhaps
later just sit in a closet collecting dust, this scanner meets all of
my needs. After all, who knows if film
even be around in ten years? If my film cameras break will I even be able to get parts or have them fixed? Will I want to? This scanner makes great regular scans too so I will have it for that if it holds up.
Just a couple of notes. First, if the film is placed in the holders correctly, then the scan will be reversed of the way the picture will look. In other words, you will have to "flip" the photo over for it to look correct. Otherwise, the picture will be backwards and any words in the photo, (signs, printed material, etc.), will read backwards. The proper way is for the emulsion side to face down.
Second, if you can get used to the advance feature instead of the basic, then you can do a lot of preliminary adjustments to color and dust removal before you actually scan the photo. This is made possible because the preview feature of the scanner makes a quick pass for previewing all the photos you are scanning. I do not use the bundled Adobe & Archsoft photo processing programs although they are fine programs. I have been using Google's picassa & Gimp which are open source programs for years and am used to them and prefer them.
A few more scans from the Canoscan 9000F:
A pic of my wife, (center), and a enlargement of just her from a slide, (sorry, the complete fullsize image shown here is a low quality pic so don't try to get a full size view of it). I have manually touched it up.


An unretouched scan from a 120 black & white negative. Not sure what film type; seems to be an off brand. Sorry, the slide and the 120 are not professional shots and I did not take them.

An un-retouched scan from a color polaroid film negative I used to test a camera I repaired.

Coming up. A comparison of a couple of scans done locally compared to the scans from the Canoscan 9000F. How will it compare? Do-no at this time. Got to go cut grass and run some errands. Let you know when I get back.
This entry was posted
on Thursday, May 12, 2011
at Thursday, May 12, 2011
. You can follow any responses to this entry through the
comments feed
.